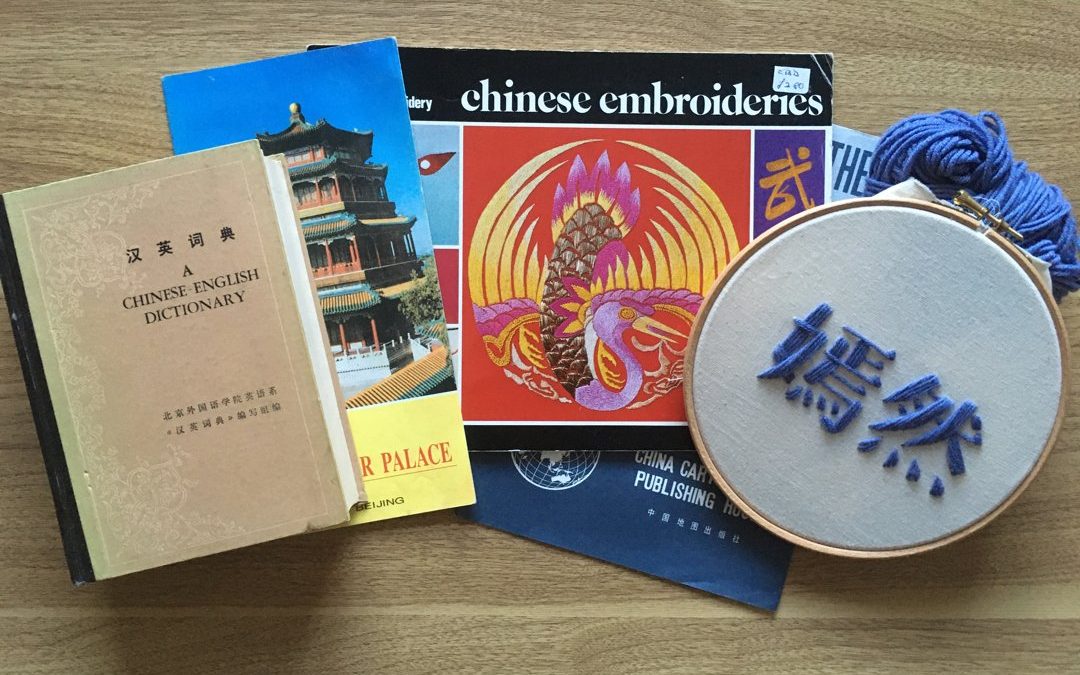
Ever since I got my hands on DMC Library’s Chinese Embroideries book I’ve fancied having a go at re-creating some of the Chinese character embroidery in the book. The book uses DMC threads (of course). But I fancied a quicker project, so I opted for some DK wool I had lying around.
I chose as my subject my Chinese name. It’s customary for Western students to adopt a Chinese name when studying in China, just as it is for Chinese people to adopt an English name when studying overseas. My Chinese language partner gave me my name when I was studying in China in 2001. “Yan Ran” (level tone, rising tone) means Shy Smile, and most people say it is very apt for me!
When writing Chinese characters you must follow a strict stroke order. The characters embroidered in the DMC book, however, have not observed this rule. The result, if you have any knowledge of Chinese, is rather odd-looking. It would be akin in English to writing the letter “t” by starting with the horizontal stroke and then writing the vertical! I felt it was important to stitch in the correct order, so I stitched from start to finish according to this, just as if I were writing the characters on paper. If you want to stitch some Chinese characters yourself but don’t know where to start, I highly recommend the YellowBridge Chinese dictionary (https://www.yellowbridge.com/chinese/dictionary.php), which shows the characters being drawn in the correct stroke order. Just press the little pen icon next to the character.
The embroideries in the DMC book have been created using either chain stitch or couching. I don’t think chain stitch is a particularly good choice for a project like this because it’s difficult to show which strokes are sitting on top of each other and therefore mimic the correct stroke order. Couching would work better than chain as it would show the stroke order; I think it would be particularly effective on a larger scale and is definitely something I’d like to try in the future. But for now, as I wanted a quicker project, I opted for a simple back stitch.

Chinese character embroidered using chain stitch

Chinese character embroidered using couching and satin stitch
The straight strokes – horizontal, vertical strokes and diagonal – were all relatively straight-forward. It was just a matter of making the stitches, or ‘strokes’, the correct length. The curved strokes, however, were a little trickier. After a few failed attempts, I was eventually able to create the right amount of curve by gradually changing the angle of the stitches, as shown below.

Stitching a curved stroke

嫣然 “Shy Smile”
For such a quick project (about 15 minutes) I’m really pleased with the result. It’s a lot more striking that I thought it would be and visually quite effective. On a friend’s suggestion, I might adapt the idea for a cushion cover. I’d also quite like to create an appliqué patch for my rucksack. That way, if I ever go to China again, I can just point to my name instead of having to pronounce it, which I never was any good at!
ea quando ho messo le mani sul libro di ricami cinesi di DMC Library, avevo voglia di provare a ricreare alcuni dei ricami dei caratteri cinesi nel libro. Il libro utilizza i fili DMC (ovviamente), ma avevo voglia di un progetto più veloce, quindi ho optato per un po’ di lana a maglia doppia che avevo in giro.
Ho scelto come soggetto il mio nome cinese. È abitudine degli studenti occidentali adottare un nome cinese quando studiano in Cina, così come è abitudine degli studenti cinesi adottare un nome inglese quando studiano all’estero. La mia partner linguistica mi ha dato il mio nome quando studiavo in Cina nel 2001. “Yan Ran” (tono alto, tono caduta) significa Sorriso Timido, e la maggior parte delle persone dice che è molto appropriato per me!
Quando si scrive caratteri cinesi si deve seguire un rigoroso ordine dei tratti. I caratteri ricamati nel libro DMC, tuttavia, non hanno rispettato questa regola. Il risultato, se si ha una conoscenza del cinese, è piuttosto strano. Sarebbe come in italiano scrivere la lettera “t” iniziando con il tratto orizzontale e poi scrivendo quello verticale! Ho sentito che era importante ricamare nell’ordine corretto, quindi ho cucito dall’inizio alla fine in base a questo, proprio come se scrivessi i caratteri su carta. Se vuoi cucire alcuni caratteri cinesi ma non sai da dove iniziare, ti consiglio vivamente il dizionario cinese di YellowBridge (https://www.yellowbridge.com/chinese/dictionary.php), che dimostra i caratteri disegnati nell’ordine corretto dei tratti. Basta premere l’icona della piccola penna accanta al carattere.
I ricami nel libro DMC sono stati creati utilizzando il punto catenella o il punto a cordone. Non penso che il punto catenella sia una scelta particolarmente buona per un progetto come questo perché è difficile mostrare quali tratti si trovano uno sopra l’altro e quindi imitare l’ordine corretto dei tratti. Il punto a cordone sarebbe meglio del punto catenella in quanto mostrerebbe l’ordine dei tratti; penso che sarebbe particolarmente efficace su scala più ampia ed è sicuramente qualcosa che mi piacerebbe provare in futuro. Ma per ora, poiché volevo un progetto più veloce, ho optato per un semplice punto indietro.
Un carattere cinese ricamato con punto catenella
Un carattere cinese ricamato con il punto a cordone e il punto piatto
I tratti dritti – orizzontali, verticali e diagonali – erano tutti relativamente semplici. Si trattava solo di creare i punti, o “tratti”, della lunghezza corretta. I tratti curvi, tuttavia, erano un po’ più complicati. Dopo alcuni tentativi falliti, sono stata finalmente in grado di creare il giusto livello di curva cambiando gradualmente l’angolo dei punti, come mostrato di seguito.
Cucire un tratto curvo
嫣然 “Sorriso Timodo”
Per un progetto così veloce (circa 15 minuti) sono davvero soddisfatta del risultato. È molto più straordinario di quanto pensassi ed è visivamente molto efficace. Su suggerimento di un’amica, potrei adattare l’idea per una fodera per cuscino. Vorrei anche creare una sagoma per il mio zaino. In questo modo, se mai dovessi tornare in Cina, potrei semplicemente indicare il mio nome invece di doverlo pronunciare, cosa in cui non sono mai stata brava!
Recent Comments