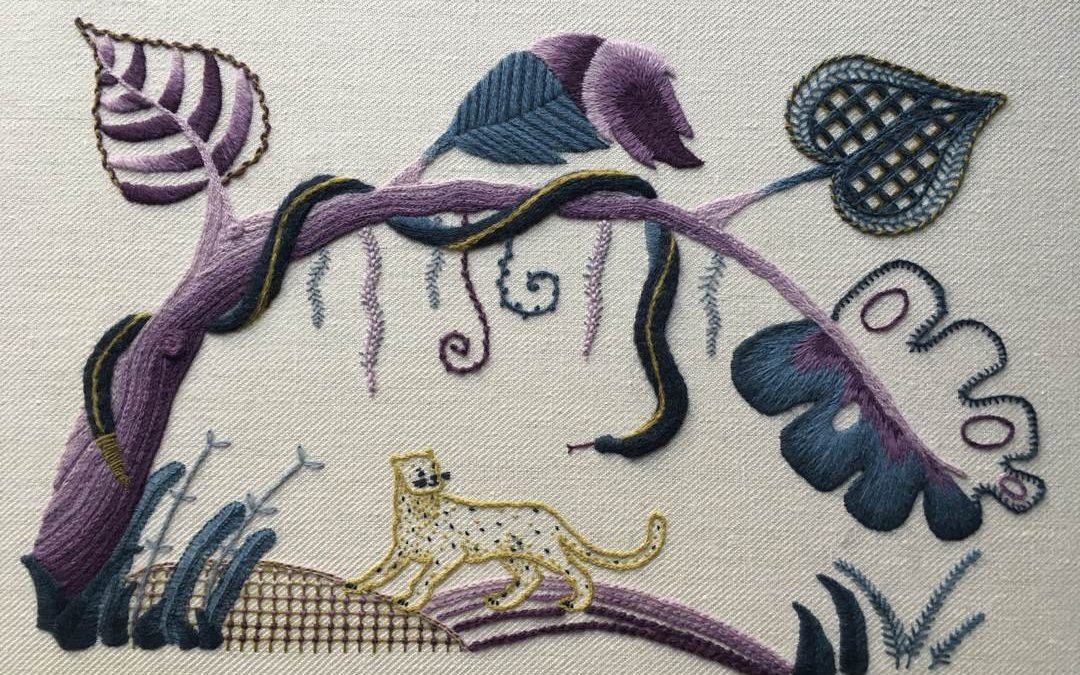
With all the main design features in place, it was time to think about the smaller elements and finer details, such as the fronds, vines and ground foliage.
I learnt the stitch ‘raised chain band’ during the Basic Skills module and knew instantly that I wanted to use it as a frond. It has a beautiful textural look to it, and is composed of a ladder stitch (just like raised stem band used for the snake) with a chain stitch threaded along it. I created the ladder in blue (just seen) and then threaded pale pink along it to create the look of blossoms. I used coral stitch and stem stitch with French knots for the two curly fronds and then fly stitch for the remaining ones in blue.

Fronds in fly, raised chain band, fly, coral and stem with French knots
The final section of foliage at the bottom left is made up of three sections: stem stitch with detached chain, Van of the piece due to all the overlapping elements, but I’m just about happy with it. Basically, I view any elements/ideas/stitches that don’t work as a learning experience. If everything goes right all the time, you don’t know what can go wrong, whereas mistakes lead to learning opportunities: you learn to fix it or at least what to do differently next time, which I think will make me a better teacher in the long run!

Foliage (from front to back):
Spikey plants in shaded fishbone stitch, fleshy reeds in shaded Van Dyke stitch, and stalks in stem stitch with petals in detached chain

Spikey plants in shaded fishbone (left) and ferns in shaded fly stitch (right)
Another ‘takeaway’ from this piece was the importance of outline stitches. In my last crewelwork embroidery, I outlined everything with couching. This was due to two reasons: i) I love couching and ii) it was the only outline stitch I could do well! The lack of variety in outlines was commented on by the assessors, so I thought it was important to try some new ones here. This time, I mixed things up with some backstitched chain, threaded back stitch and whipped couching:

Backstitched chain

Threaded backstitch

Whipped couching
I particularly love the threaded back stitch. It’s so simple to do yet it gives the leaf a striking textured look. You might also notice that all of these stitches use two colours, which makes them ideal for using the accent colour. What was really interesting, though, was how different these stitches appeared depending on how the two were combined, which shows how important it is to sample before stitching. I am now a total convert to the importance of outline stitches!
I hope you enjoyed this post and reading about how my design was created. Let me know your thoughts in the comments section below. Do you have a favourite bit? Or have you tried Jacobean crewelwork before. If so, how did it go?
Till next time. Happy stitching x
Con tutte le caratteristiche principali del disegno in atto, era il momento di pensare agli elementi più piccoli e ai dettagli più fini, come le fronde, le viti e il fogliame a terra.
Ho imparato il punto catena sollevata durante il modulo “Competenze di base” e ho capito subito che volevo usarlo come una fronda. Ha un bell’aspetto operato ed è composto da un punto base a forme di scala (proprio come il punto erba in rilievo usato per il serpente) con un punto catenella infilato lungo di esso. Ho cucito il punto base in blu e poi ho infilato un filo di colore rosa pallido lungo di esso per creare l’aspetto dei fiori. Ho usato punto arabesco e punto erba con punto nodi per le due fronde ricci e poi punto mosca per le restanti in blu.
Le fronde in punto mosca, punto catena sollevata, punto mosca, punto arabesco e punto erba con punto nodi
La sezione finale di fogliame in basso a sinistra è composta da tre sezioni: punto erba con punto margherita, punto a triangoli con contorno a punto indietro, e punto lisca. Penso che questa sezione sia forse la meno riuscita a causa di tutti gli elementi sovrapposti, ma ne sono quasi soddisfatta. Fondamentalmente, vedo tutti gli elementi / idee / punti che non funzionano come un’esperienza di apprendimento. Se tutto va sempre bene, non si sa cosa può andare storto, mentre gli errori portano a opportunità di apprendimento: si impara a rimediare o almeno a cosa fare diversamente la prossima volta; penso che questo mi renderà un’insegnante migliore a lungo termine!
La fogliame (da davanti a dietro):
Spuntoni cuciti a punto lisca sfumato, canne cucite a punto a triangolo sfumato, e steli cuciti a punto erba con petali a punto margherita
Spuntoni cuciti a punto lisca sfumato (a sinistra) e felci cuciti a punto mosca sfumato (a destra)
Un’altra lezione chiave imparata cucendo questo ricamo è stata l’importanza dei punti di contorno. Quando ho fatto il ricamo in lana per il Certificato RSN, ho tracciato il contorno di tutto con il punto a cordone. Ciò era dovuto a due ragioni: i) adoro il punto a cordone e ii) era l’unico punto di contorno che potevo fare bene! La mancanza di varietà è stata notata dai valutatori, quindi ho pensato che fosse importante provarne di nuovi qui. Questa volta, ho usato il punto catenella ricamato con un linea di impuntura dentro alla catenella, il punto indietro con filo passante, ed il punto a cordone avvolto:
Il punto catenella ricamato con un linea di impuntura dentro alla catenella
Il punto indietro con filo passante
Il punto a cordone avvolto
Amo particolarmente il punto indietro con filo passante. È così semplice da fare eppure conferisce alla foglia un aspetto operato sorprendente. Potresti anche notare che tutti questi punti usano due colori, il che li rende ideali per l’uso con il colore accento. Ciò che è stato davvero interessante, tuttavia, è stato il modo in cui questi punti apparivano diversi a seconda di come venivano combinati i due colori, che evidenzia l’importanza di provare i punti prima di cucirli. Ora sono una convertita totale all’importanza dei punti di contorno!
Beh, spero ti sia piaciuto leggere come è stato creato il mio design. Fammi sapere i tuoi pensieri nella sezione commenti qui sotto. Hai un elemento preferito? O hai già provato cucire il ricamo in lana in stile dell’epoca di Giacomo I? Se sì, come è andato?
Alla prossima volta. Buona Cucitura x
Recent Comments