Before we were unleashed onto the various modules and techniques at the RSN, we first had to complete the ‘Basic Skills’ module. This consisted of stitching a simple floral design with a focus on a stitch known as ‘long and short’. We were taught by the lovely Debra Jackson, an alumna of the RSN, who all the students and tutors hold in very high esteem.
We had five days of tuition and learnt/revisited ‘framing up’ (where the embroidery fabric is attached to the slate frame), a range of stitches, and ‘mounting’ (where the finished embroidery is removed from the frame and placed on stiff card, ready for display).
We used Appleton’s crewel wool in three colours on linen twill: two main colours and one accent colour (just as you do for the Jacobean Crewelwork module). I was familiar with a number of the stitches in the design, having already encountered them during the RSN Certificate, such as long and short, split, stem, satin, chain, seed, fly and French knots. However, it never hurts to revisit stitches, especially under the guidance of a new tutor, and I also learnt some new ones, including whipped stem, whipped chain and raised chain band, which I particularly enjoyed, once I got the hang of it.
The module was quite intense. I am a very slow stitcher, so there were a number of late nights, but we both finished on time and mounted on our last day. No close-ups as the piece has been handed in for a mock assessment. I’ll upload these as soon as we get them back. In the meantime, onwards to Jacobean Crewelwork!

Transferring the design to the linen twill using the ‘prick and pounce’ method

A work in progress!

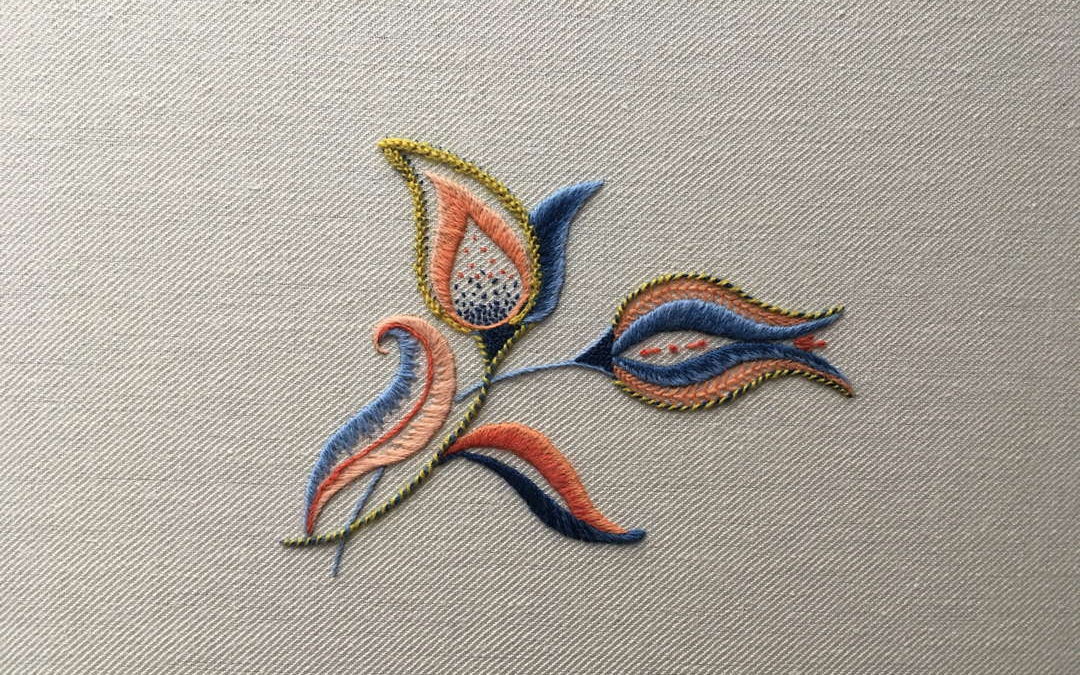
The completed design
Prima di poter iniziare con i vari moduli e tecniche alla Royal School of Needlework (RSN), abbiamo dovuto completare il modulo “Competenze di base”. Consisteva nel cucire un semplice disegno floreale con un focus su il punto che si chiama “punto pittura”. Ci è stato insegnato dalla gentile Debra Jackson, una laureata della RSN e molto apprezata da tutti le studentesse e insegnanti.
Abbiamo avuto cinque giorni di lezioni e imparato/rivisitato il montaggio del tessuto da ricamo sul telaio a rulli, una serie di punti, e il montaggio del ricamo finito su di una tavola, pronto per la incorniciatura.
Abbiamo utilizzato la lana da ricamo di Appleton in tre colori su twill di lino: due colori principali e un colore accento (proprio come si fa per il modulo “Ricamo in lana in stile dell’epoca di Giacomo I”). Conoscevo un certo numero di punti nel disegno, avendoli già incontrati durante il corso del certificato RSN, come punti pittura, spezzato, erba, piatto, catenella, seme, mosca e nodi. Tuttavia, non fa mai male rivisitare i punti, soprattutto sotto la guida di una nuova insegnante, e ne ho anche imparati di nuovi, tra cui il punto erba avvolto, il punto catenella avvolto e il punto catena sollevata, che, una volta capito, ho particolarmente apprezzato.
Il modulo è stato piuttosto intenso. Sono una ricamatrice molto lenta, quindi sono andata a dormire ad ora tarda diverse notti, ma tutt’e due abbiamo finito in tempo e montato il ricamo l’ultimo giorno. Nessun primo piano in quanto il ricamo è stato consegnato per una valutazione fittizia. Li caricherò non appena li riavremo. Nel frattempo, avanti al Ricamo in stile dell’epoca di Giacomo I!
Trasferimento del disegno al twill di lino utilizzando il metodo “prick e pounce”
Un lavoro in corso!
Il ricamo completato
Recent Comments